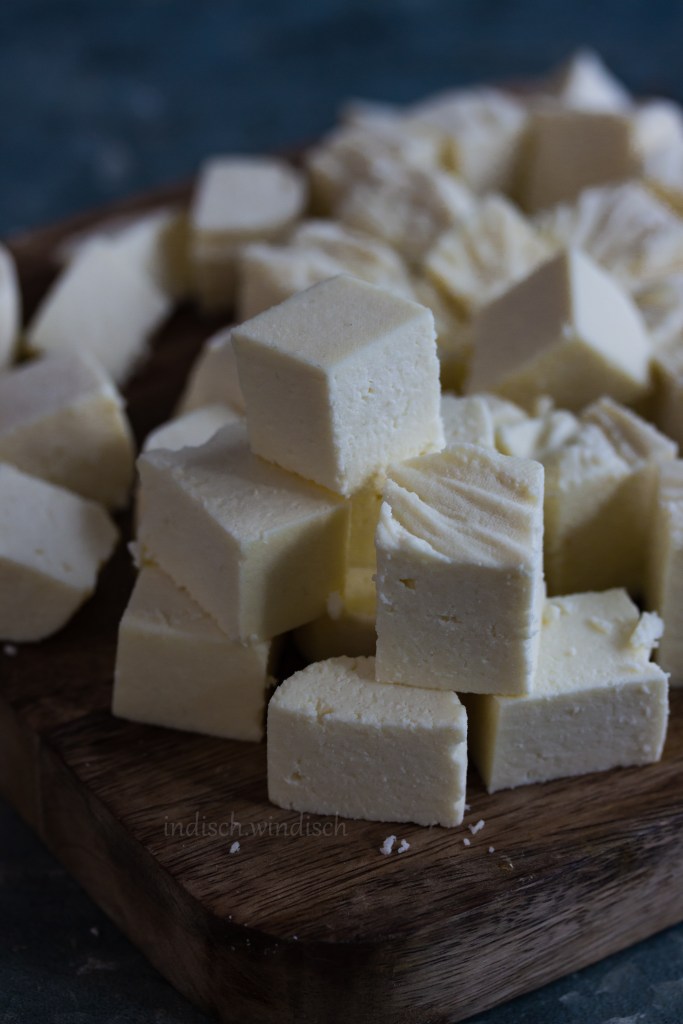
Soft and creamy, but still firm enough to be cubed. That’s the paneer we want.

Paneer Experiments
If you are following me on Instagram (https://www.instagram.com/indisch.windisch/) you would have followed along the paneer experiments. I have been experimenting with different brands of milk, adding different ingredients, different methods to make paneer since more than two weeks. Like with any experiment, I failed at times and succeeded at others. I compared the texture and taste of paneer that I made. I aimed at making paneer that was creamy and soft, but still firm enough to be cut into cubes. The paneer that isn’t too dry when you put it into your mouth and doesn’t crumble or crack when you try to cut it. If you have made paneer at home you would know that these are some of the common problems with homemade paneer.


My other aim was to make paneer using milk that is easily available to most of my audience at reasonable prices. It is why we are making paneer at home in the first place: to make it easily/economically available to us. So why try making it with ingredients that you need to source from complicated places right?
Categorization on milk available at German grocery stores
With the choice of milk available these days at the grocery stores, you will be left confused as to which one to buy. Listing down the most standard choices that are available at the German grocery stores.

Sorting by fat content: Depending on the fat content after processing the milk, it is generally categorized into the following two categories.
- 1.5% fat – Either marked as 1,5% fett or fettarmer-Milch, this one is the fat reduced or skimmed type. Do not buy this one for making paneer. It won’t give you good results.
- 3.5% or 3.8% fat – Also marked as vollmilch, this one is the full fat milk. The highest percentage of fat that is available at the grocery store is 3.8% (written 3,8% fett).
Sorting by origin/processing: Depending upon the kind of cows or the region that the cows come from, the milk is categorized into different categories. Other than that, the way of processing also plays a role in categorization.
- Bio or non bio milk – As the name suggests, one is organic and the other is not organic. It means that the organic one comes from cows that aren’t given any hormones/antibiotics to produce milk.
- Alpenmilch: The milk derived from cows that live in the Alpen region is labelled as Alpenmilch.
- Weidemilch: Weidemilch is derived from cows that feed on fields. The cows are allowed to roam around freely and are grass fed for most part of the year.
- Bergbauernmilch or Bauernmilch: This milk is derived from cows that live on a farm.
- Haltbare-Milch: This one is processed in a way which makes it longer lasting. This kind of milk often has an expiry date of a few months.
Which milk makes the best paneer?
Theoretically, you could use any full fat milk to make paneer. But depending on the kind used, you will get different results (texture, taste, firmness). When comparing results from different brands, I liked the paneer made using Weidemilch (free range) the best. The paneer was smooth and creamy, and tasted delicious. It is available at Aldi in a brown packaging (pictured below).

What other ingredient/s do I need?
Other than milk, you need two other ingredients:
- Lime juice: It is the acidic agents that results in curdling the milk. You can also use lemon juice instead. The quantity used is essential. You want enough acidity to help the milk curdle but not too much to make the taste overpowering.
- Cream: I love the creaminess and smoothness cream brings to paneer. I add schlagsahne (30% fat) to my milk for added creaminess. If you skip cream, your paneer might come out dry and crumbly.


Ways to store homemade paneer
If you are like me and prefer making things in big batches and store for later use, you are going to appreciate this paneer even more. You can double or triple the ingredients quantity and make big batches. To store, I recommend cutting the paneer in cubes and dividing into portions. You can then put them into ziplock bags and refrigerate or freeze it.
- Stored in refrigerator, the paneer stays good for at least 3-4 days.
- Stored in freezer, the paneer stays good for upto 1 month.
To defrost, transfer from the freezer to fridge section about 8-10 hours before needed. Or put the ziplock bag with the frozen paneer into some warm water for a few hours. Make sure that the ziplock bag is properly sealed.
Please note: Freezing and defrosting the paneer will slightly affect the texture. The paneer may become a little crumblier comparatively, but nothing too dramatic.
How to use paneer in a recipe?
Now that you have made paneer, you must be wondering how to cook it, especially if you haven’t cooked it before. Paneer is very versatile and could be used in a number of ways. You can replace chicken with paneer in any mild tasting curry. It is a good source of vegetarian protein and also rich in calcium and phosphorous. You can also marinate it, put into skewers and grill it. Or make a paneer stir fry by throwing in some onion, paprika and other vegetables of your choice. The options are endless.
I will be doing a PANEER SERIES starting this wednesday where I will share recipes using paneer. The series will take place from 19th January until 9th February. Make sure to check the website every Wednesday to keep updated. You can also follow me on Instagram (indisch.windisch) to keep updated with upcoming recipes and follow my stories.

Please check out the following video to watch the whole process.

How to Make Paneer Like a Pro?
Ingredients
Method
- Squeeze out the juice from limes/lemons, passing through a strainer to get rid of the seeds or any particles. You should have about 75 ml (or ¼ cup) of lime/lemon juice. Set aside until needed.

- In a big, heavy based pan pour the milk and the cream. Switch on the heat and bring to a boil.

- As soon as it boils, add lime juice and immediately switch off the heat. Give a quick mix to spread around lime juice evenly but do not overmix.

- Let the mixture sit for 2-3 minutes to let the milk curdle properly.

- In the meanwhile prepare for straining the mixture by taking a big bowl and putting a big sieve into it. Spread a cheesecloth to cover the sieve.

- Slowly pour all of the curdled mixture into the cheesecloth. Let the water drain for a few minutes then carefully give it a squeeze.

- Tie 2 rubber bands tightly around the cheesecloth and give a final squeeze to remove as much liquid as possible.

- Place the cheesecloth with paneer onto a plate and put a few heavy objects onto it (like heavy skillets or pans). Make sure that the objects you place are sitting stably and the weight is evenly distributed. Leave it preferable for 2-3 hours, or at least 30 minutes.

- Remove the cheesecloth and the excess liquid that came out of the paneer. You will now be able to cut the paneer into cubes. Store into a ziplock bag after cutting into cubes and dividing into portions.

Notes
- Using any other brand of milk/cream will give you different results.
- For a firm block of paneer leaving it longer under weight will give you best results.
- You can store the paneer in the fridge for up to 3-4 days and into the freezer for up to 1 month.
- Do not throw away the whey (leftover liquid from the paneer making process) as it is rich in nutrients. Use it in place of water for cooking rice/lentils, kadhi or soups.
- If frying paneer for any recipe, make sure to use a non stick skillet to avoid burning.
5 Comments Add yours